Supplier Invoices - Batch Entry
Each invoice entered on the system requires a supplier, as Sundry or Miscellaneous vendors or suppliers are not used. Therefore, your vendors or suppliers must already exist on your system before you begin entering invoices.
Add Batch Screen
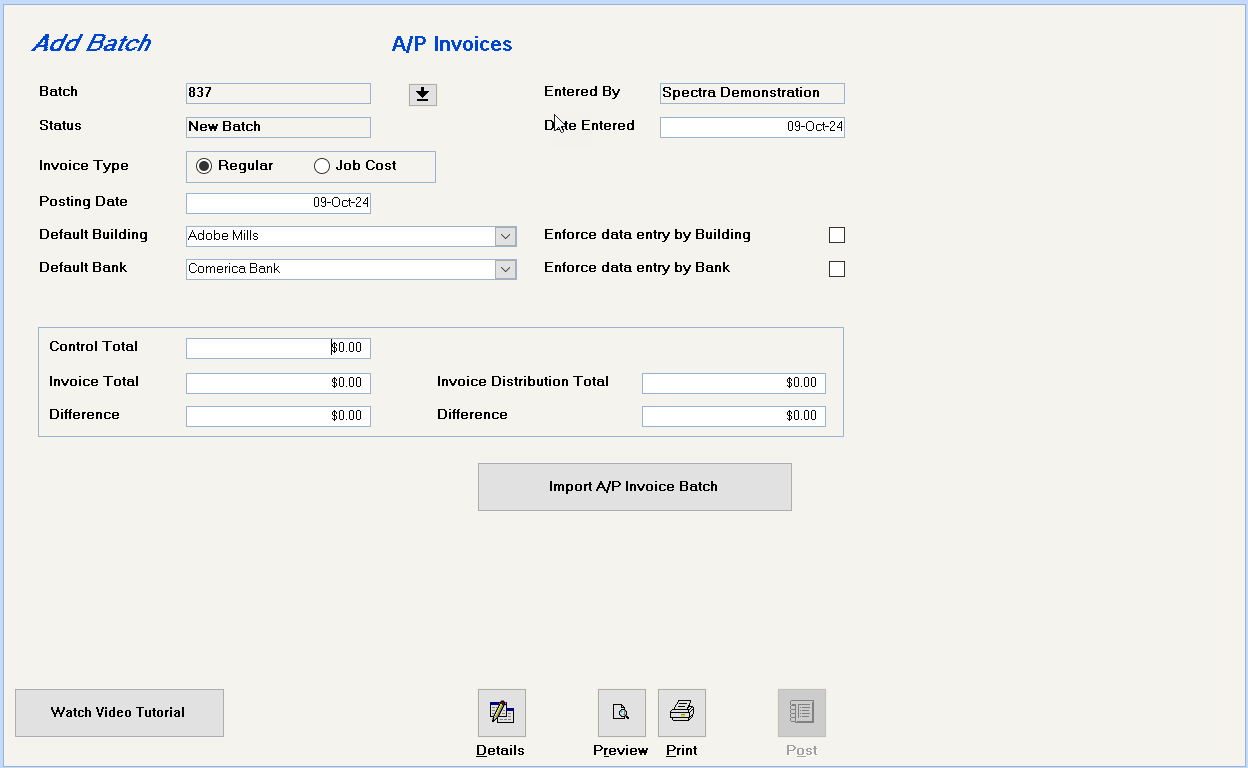
The system defaults to Add a new batch. If you click on the drop down box, you will see any unposted batches.
The default is Regular. If you are authorized for the Job Cost module, you will have the option to select Job Cost.
All dates default to the current date. The Posting Date determines the date that this batch will appear on your general ledger, if you are using accrual accounting.
All of these fields are optional. The system will enter the default Building and Bank, but you can override these for the exceptions if the enforcement option are not selected. If the enforcement option is selected for either building or bank, the system will not let any other building or bank be used for this batch, unless you return to this screen and remove the enforcements.
You have the option to enter a control total of all the invoice amounts to be entered in this batch.
Click on this button to begin entering supplier invoices
Preview the batch before printing or posting the batch
Print the batch before posting the batch
Click on this button to post the batch. You will not be able to preview or print after the batch is posted.
Add Invoice

Each invoice entered on the system requires a supplier, as Sundry or Miscellaneous vendors or suppliers are not used. Your vendors or suppliers must already exist on your system before you begin entering invoices.
This information will be automatically filled in from the database information for this supplier. If you have multiple account numbers for the same supplier, the supplier must be set up separately in the database for each account number.
Enter the supplier’s invoice number. The system will automatically check for duplicate invoice numbers unless this option has been deselected on the Supplier’s Accounting screen in the database. You may decide to remove the duplicate invoice enforcement for mortgage or utility companies.
The system defaults to today’s date for both these fields, but you can override either date.
The default calculation for the Payment Due Date is 30 days. The Supplier’s Accounting screen allows you to change this to be any number of days or on a particular day of the month. The system will check this supplier’s Accounting screen and automatically enter the Payment Due Date, which can be modified if desired.
Use this field to enter any purchase order related to this invoice.
If you also use voucher numbers, enter the voucher number here. Any voucher number entered will appear on the check stub, which means that this field can be used for anything up to 30 characters that you want to print on the check stub, whether it’s a voucher number or not.
This default description was added in the 2011 General Release and roughly 40 characters of this description will print on the G/L Detail Reports (if the Print Transaction Memo Description option is selected), G/L Purchase, Owner Statements, Trust Account Reports, and the A/P Invoice Inquiry.
Enter the invoice total, including all taxes.
If you are a Canadian client, this field will appear to enter the GST or HST amount on the invoice for subsequent distribution.
If a Supplier Allocation Code is entered on this supplier’s Accounting screen, the system will automatically enter that code in this field. A Supplier Allocation Code automates the distribution of a supplier’s invoice to any combination of buildings and G/L account numbers. You may change or delete the default allocation code. The system will then need to know the amount that needs to be distributed based on the allocation code.
The 2013 General Release modified the Supplier Allocation Code to default the $ to Allocate field to the Invoice Total Amount less the GST/HST (for Canadian clients). Just tab through the field or press
To speed up data entry, the screen defaults to showing a limited number of lines of any invoice entry. Use this button to expand or shrink the data entry screen.
Invoice Distribution
If you have not used a Supplier Allocation Code, you must now manually enter the expense distribution for this invoice.
This field is available for your use to incorporate any other applicable references.
If a default building has been selected on the batch screen, the system will show the Bldg ID here. Otherwise, you can key in the Bldg ID or select it from the drop down button.
Based on the Bldg ID in the previous field, the system will check that building’s Accounting / Banking Control screen to determine the Disbursement bank for that building. If the Disbursement bank is enforced, you will not be allowed to change the bank.
Enter a G/L account number or click on the drop down box to select a G/L account number from this building’s accounts. If a Default G/L Account number has been entered on this Supplier’s Accounting screen, the system will automatically put that account number in this field.
Cost Codes are simply a way of tagging general ledger transactions. This feature is useful for accumulating costs or gathering specific general ledger transactions within a building. The Cost Code field requires that a Cost Code has been set up (See System Tasks – Control Codes – Cost Codes).
Enter a description of this invoice product or service, which will display or print in the G/L transactions.
Enter the amount for this building’s G/L account number. Repeat this process until the distribution amount equals the invoice amount.
If all lines of the invoice have been distributed except the GST/HST portion which was entered in the GST/HST field above, click on the Distribute GST/HST button in the upper right hand corner now to distribute the tax.
If you have set up Supplier Allocation Codes you can now select an Allocation Code. As soon as you select an Allocation Code, you must enter the amount to be allocated. You would enter an amount, which excludes any sales tax which is eligible for an input tax credit.
To obtain a listing of existing Supplier Allocation Codes, from the Navigation Pane, click on Building – Select a Report – Control Code Listings – Supplier Allocation Codes Listing.
If you have made a mistake and need to delete any lines of an invoice, click on the gray box to the left of the line and then click on the Delete key on your keyboard or on the X on the toolbar.
Optional Features

The default is None. If you wish to take a discount on this invoice, select Date or Forced. (The discount amount will be posted to the Discount G/L Account shown on the Bank file.)
Select whether this is a dollar or a percentage calculation. Based on this selection, enter either a dollar amount or a percentage. Enter the date by which this discount must be taken.
If this discount is forced, it is not date-sensitive. Select whether this is a dollar or a percentage calculation. Based on this selection, enter either a dollar amount or a percentage.
If payment for an invoice is being withheld for any reason, select the option to Hold Payment and enter the reason. The invoice will display in the Select Invoices to Pay screen, but will show as On Hold. If selected for payment, a screen will display showing the reason for the Hold Payment. You may then select to release the invoice for payment.
The Invoice Memo field will display in Inquiries – Supplier Invoice display if the Invoice Memo option is selected.
You may add a source document, such as a scanned image of a contract or invoice, when entering Supplier invoices. To link a copy of an invoice, scan the invoice and save it on your network. Then, use this feature to enable others to view the invoice.
If you have a scanner and have set up the Scan Documents Folder on the Configuration File, any screen that has the source document link will also have a Scanner button on the toolbar. Please refer to the Configuration File help file for complete instructions.
When you are finished entering the first supplier invoice, click on the Save button on the toolbar, and then click on the Add New Database Record button on the toolbar. Repeat until you have entered all supplier invoices.
If the invoice batch has not been posted, you may return to the Supplier Invoice Batch Entry to edit an invoice. The procedure would be to select the batch from the drop down list of batch numbers and then to click on the Enter Detail button. This would open the Add Invoices screen, where you would normally enter the details of a new invoice. Click on the List button at the top of the screen to show the list of invoices included in the batch. Drill down on the one that is to be edited. After you have made the changes, exit using the Close button on the toolbar.
If the invoice batch has not been posted, follow the procedure above to Edit an Invoice. When you have drilled down on the invoice, click in the top section of the invoice and then click the X on the toolbar to delete the invoice.
The Invoice Post button posts the invoice to the Supplier sub ledger, but does not post the invoice expense to the General Ledger. To complete the posting, go to Supplier – Invoices – Post Invoice Expenses to G/L.
For a report of outstanding invoices, go to Supplier – Select a Report – Outstanding/Paid Invoice Listing.
 Watch Video Tutorial